How to Set up VXDIAG VCX SE Benz for Sprinter VS30 Variant Coding?
Topic: Mercedes Sprinter W907 VS30 diagnostics and variant coding using VXDIAG VCX SE Benz Xentry and DTS Monaco software.
Purpose:
Need to set up a proper diagnostic and variant coding scanner for the 2022 Mercedes Sprinter 4×4 with the V6 Diesel engine.
By now, the user has been able to get everything running regularly and can now use X-ENTRY to diagnose the van, clear codes, see underlying data, and more. He is also able to do basic coding in DTS Monaco. Here is a write-up that outlines what he did to get things working.
NOTE: This is not our work. Credit to KrellyKryl from sprinter-source.com. Thank you for your awesome contribution!!!
You are at your own risk.
Hardware and software
The easiest way to get the entire ecosystem is to purchase the whole Mercedes Star Diagnostic Tool suite with all the hardware, multiplexer, software, etc. It’s expensive, but it’s the best option. X-ENTRY PassThru is also available for an annual fee.
Other options also exist. You can obtain the various software packages as PassThru versions with devices such as the Tactrix OpenPort 2.0. For many (even most), this might be the best option, but I’m not going to go into such systems here, but it’s worth researching if you want to learn more about the whole ecosystem.
Here, I will instead focus on the options from VXDIAG (no affiliation). They make various multi-vehicle (including Benz) tools, such as the VCX SE and AllScanner devices and bundle up all the various software on ready-to-go SSDs, HDDs or used laptops &nD-A-Sh; shipping takes about a week. If you are on a newer (2020+) laptop and want to boot from an external harddrive, you will likely need to convert the partition from MBR to GPT, which can be done with e.g., EaseUS. Once done, you can boot from the external hard drive using the loaded SSD and clone it to an internal hard drive, also using EaseUS.
Overview of the VXDIAG VCX SE device
To use any of the supplied software, you need to connect your PC to your van via the OBD2 port using a “Vehicle Communication Interface”, or hardware VCI. As mentioned above, many different VCI devices can achieve that, but here I’ll focus on the VCX SE device. It is a pretty powerful little thing, which works across different car brands and supports all the main protocols, including DoIP, UDS, and DoNET. It also works with both PassThru and OpenShell (as a multiplexer) versions of X-ENTRY. The device can be connected to your computer via ethernet, wifi, and a supplied USB-C to USB-A cable. All options work about the same, however, to maintain wifi connectivity to a network, I prefer to use the USB-C cable connection. The device comes with no instructions, but it’s pretty intuitive &nD-A-Sh; plug it in, attach the cable to your computer, and then do the rest via software.
Overview of VXDIAG software
If you get an SSD or used laptop pre-loaded with software from VXDIAG it’ll contain a boatload of stuff, most of which you don’t need. A lot of it will also be in Chinese, so the first thing you want to do is get all of that cleaned up by removing programs you likely don’t need (e.g., chat tools, email clients, browsers, and more). While this is a little daunting, you can ignore most of the software, shortcuts, and icons, because everything is pretty much set up to go and you mostly only need the following software packages:
- VCX Manager. This is the main software that will control the connection between your van, the VCI, and all downstream software.
- X-ENTRY (Offline). This is the main software for diagnostics.
- X-ENTRY Diagnosis Stop. X-ENTRY is often not able to shut down properly, so you can run this little script to stop the session.
- DTS Monaco. This is the main software for coding. Version 8 comes pre-installed.
- W-I-S, E-P-C, STAR-Finder, SD-Media, and other STAR tools. These come pre-installed too and might run via virtualization software. I don’t really use most of these, although W-I-S and E-P-C can be helpful.
As mentioned above, a lot of unneeded stuff was installed and there are installers all over the place. Since everything is set up ready to go, you can get rid of most/all of that &nD-A-Sh; I transferred installers, etc., to an external hard drive, just in case. For easy access, I dropped the programs I use into the Windows taskbar.
How to use VX Manager
This tool is the main software communicating with your VCX SE device (VCI). Note, you don’t need to have the VCI connected to your van for any of this to work (notice the low OBD voltage in the images below). When you turn on your laptop without the VCI connected, you’ll get an error like this popping up:
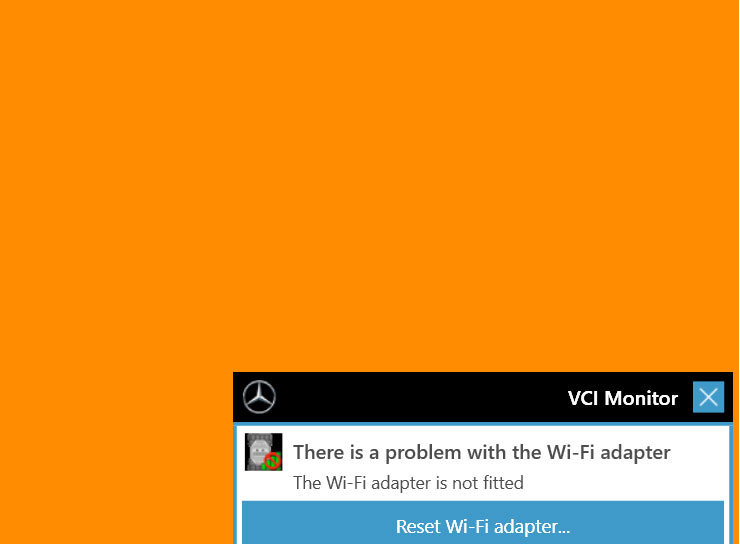
You can ignore that. Once you connect the VCI e.g., via the supplied USB cable, you’ll get the following:
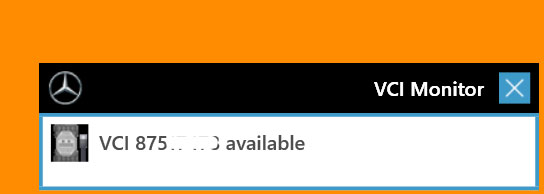
You’ll likely also see a “VCI-new” message pop up &nD-A-Sh; minimize that window to the taskbar, but don’t close it. That means the VCX SE is now connected to your computer, so it’s time to open up the VX Manager. When you do, it’s possible you might see the following at first:
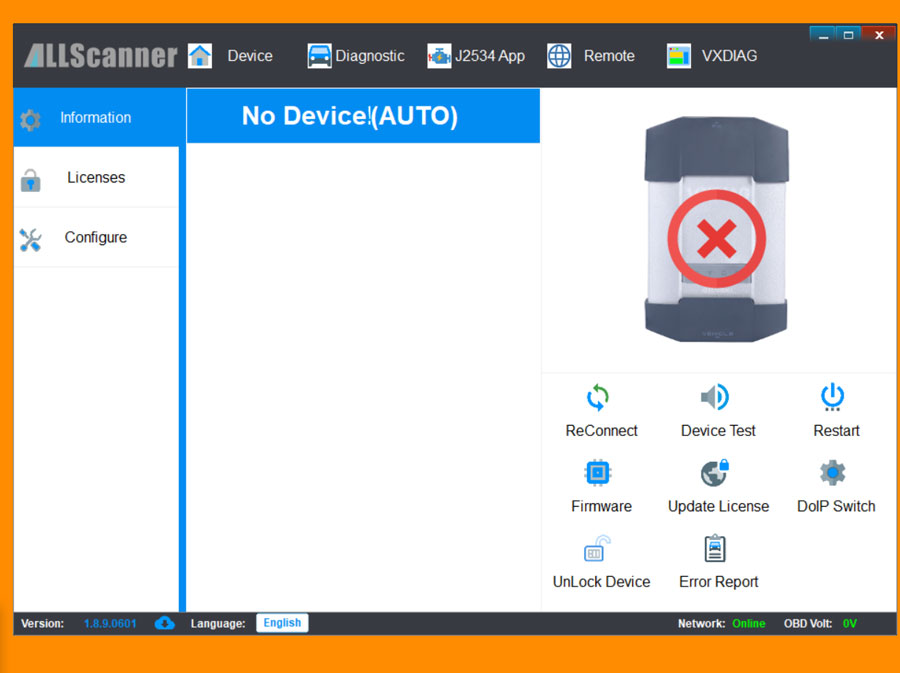
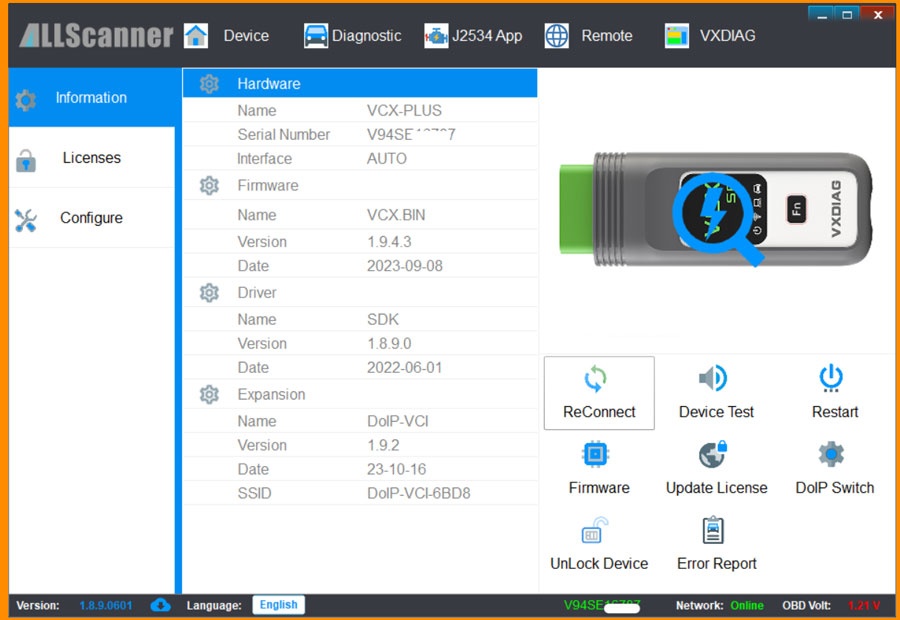
Wait a minute and your device should show up. If not, press the ReConnect button and you should hear a beep from the VCI. Once everything is connected, you should see this:
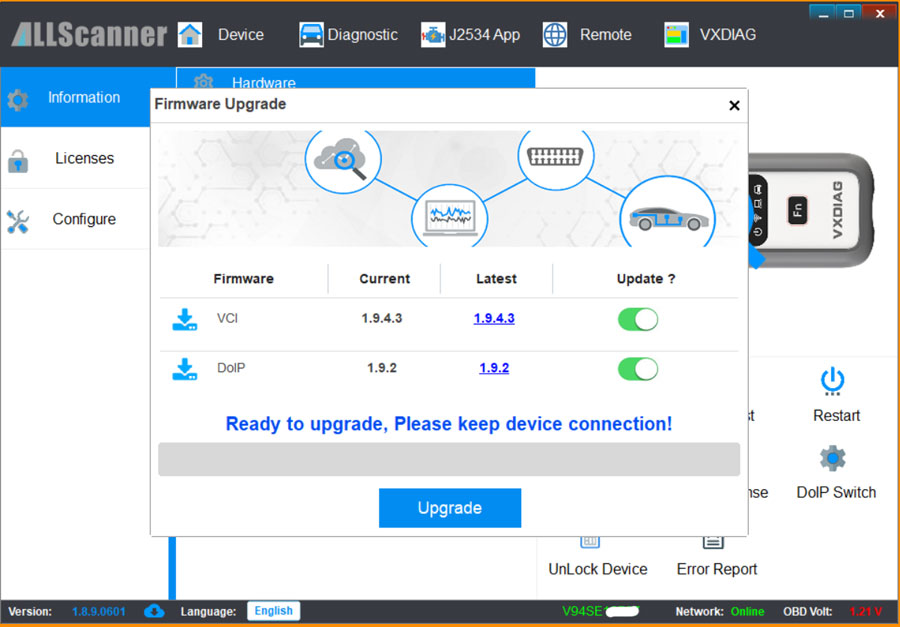
Now, it’s time to ensure that all the required VCX software, firmware, licenses, etc. are up-to-date.
Update your firmware in the “Device” tab:
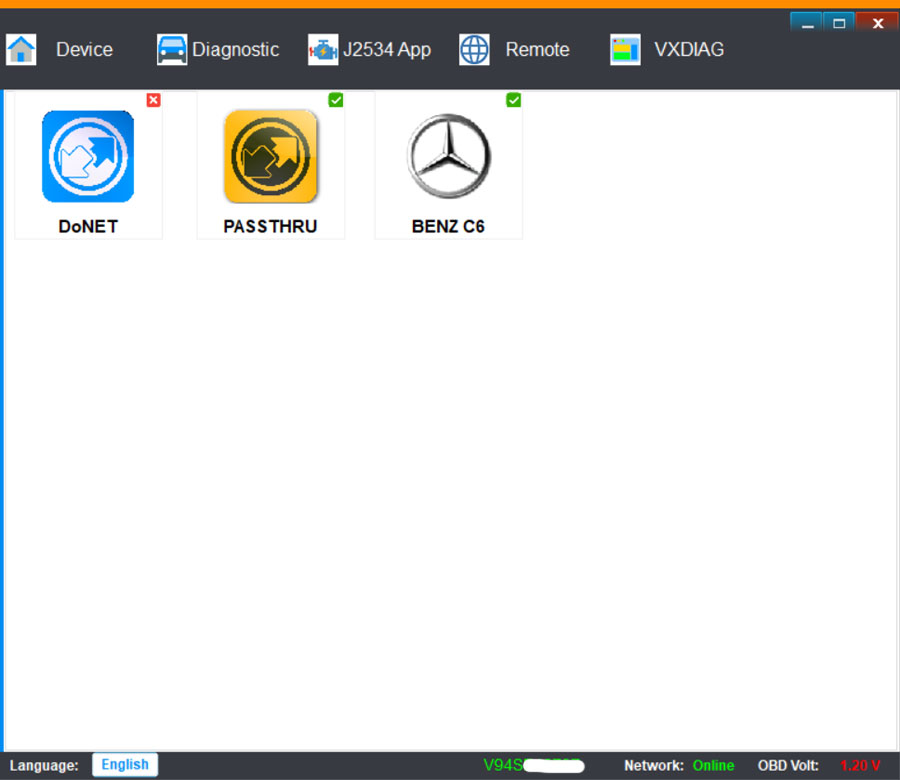
Make sure the correct diagnostic software is installed under the “Diagnostic” tab &nD-A-Sh; you likely want both PassThru (pre-installed) and Benz C6 (likely not pre-installed &nD-A-Sh; click the icon and press install):
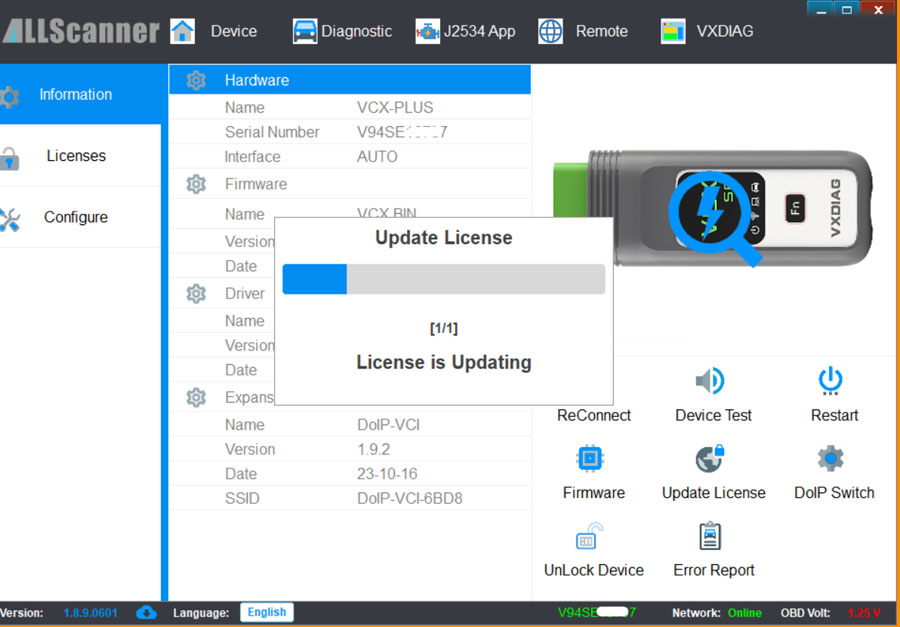
Finally, go back to the “Device” tab and update the licenses. Once done, everything should be ready to go.
Now, it’s time to head out to your van and plug the VCI into your OBD2 port. Press the Start button twice, without pressing the brake pedal, so the car is on, but the engine isn’t running. To preserve battery, turn off A/C, head unit, etc. With the VCX Manager open and the VCI plugged into your van and the computer, press the “ReConnect” button to make sure everything is connected. If yes, you should be able to see the voltage of your starter battery under the “OBD Volt”, which should read ~12.6V. Is it >13.5V? Turn off that engine, dammit, and try again. Lower than expected? Go drive your van for a bit to recharge the battery (or, alternatively, connect to a trickle charger).
To make everything work properly, press the “DoIP Switch” under the “Device” tab. Once the window opens, select “BENZ (ISO-13400)” and press the “DoIP ON” button. A “DoIP UDP Send” window should pop up. Press “OK” and minimize the DoIP Config window. You’re now ready to rock and roll!
Getting started with X-ENTRY
Now the fun begins… The good news is that X-ENTRY is quite easy to use and it’s more straight-forward than many of the OBD2 scanners out there, including those from Foxwell and ThinkDiag &nD-A-Sh; although, as mentioned above, those are fine devices too (I have both. As well as a BlueDriver, OBDLink MX+, OBDeleven, and Carista, which only work as simple OBD2 scanners for Mercedes, but I digress..). In addition to being more user-friendly, it’s also faster, provides helpful diagnostic hints and instructions, and is overall, just much more powerful &nD-A-Sh; as one would expect, since this is the OEM software.
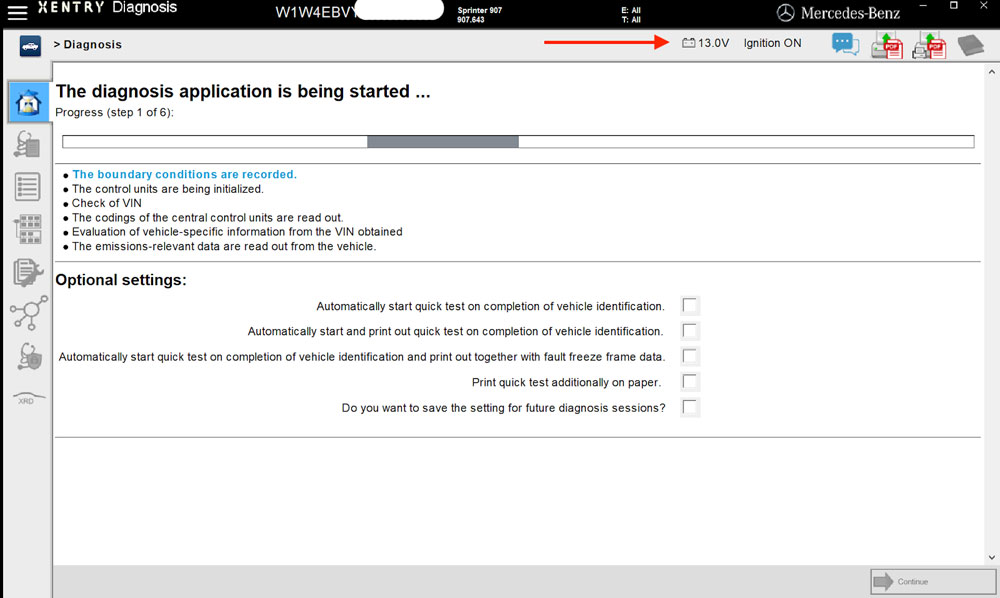
Before you start, make sure everything is connected, the VCI interface is active (check your taskbar), the DoIP switch is on, and the van is on, engine off. Boot up X-ENTRY and it should automatically read your VIN if you’re using an “OpenShell” version. Wait a little and if everything is connected properly, X-ENTRY should read your OBD voltage and status of the ignition:
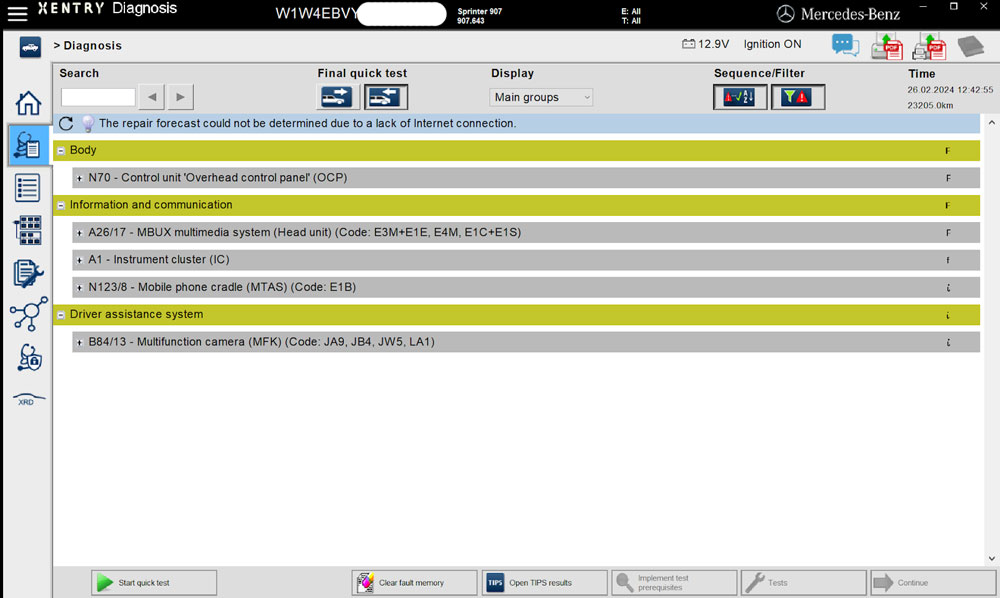
Once initial steps have completed, press the second tab on the left to go to the “diagnostics” portion of X-ENTRY. Run a Quick Test and you will see the program running through all the various components (ECUs) in your van. These will be helpful for DTS Monaco too, so more about that later.
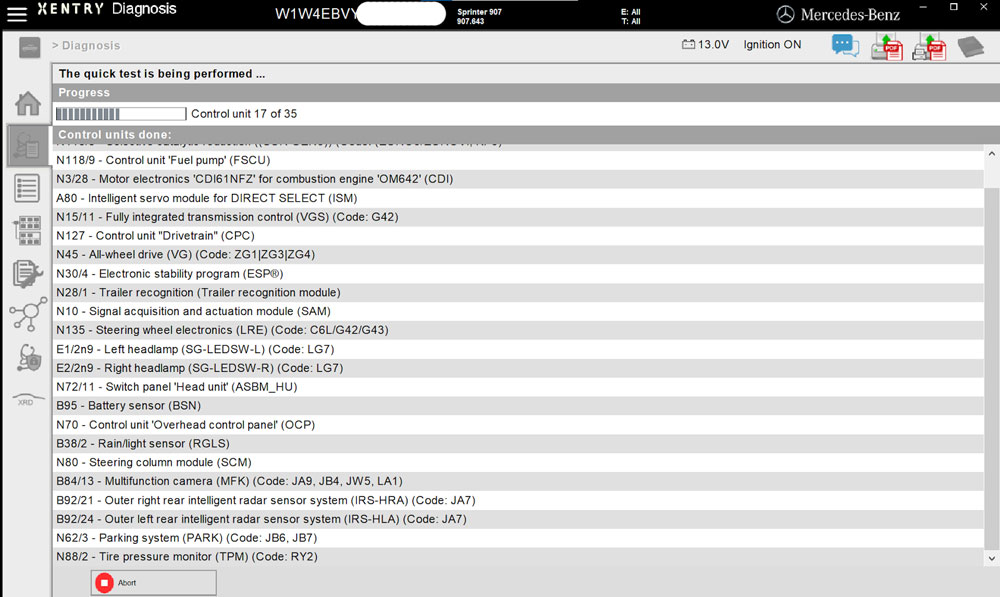
Once the Quick Test has completed, you’ll get the results, including whatever error codes X-ENTRY might have found. You can use the “Sequence/Filter” to just show error/event codes &nD-A-Sh; otherW-I-Se all tested modules will be shown. On the right, you’ll see the following:
F = fault that is stored and current. These can’t be cleared because of an underlying problem.
f = older fault that was stored. You can clear these (but note, if the underlying cause is not fixed, they’ll come back).
𝒾 = some sort of “event” has occurred, but it isn’t a fault. This simply means that additional information related to a specific test result is available, but it varies what that information is. Click through and X-ENTRY will tell you. Typically, these can be ignored &nD-A-Sh; for example, during my test it flagged the “Mobile phone cradle”, but that isn’t installed as an option in my van and X-ENTRY, correctly, told me I could ignore the event. Typically (always?) these also cannot be cleared.
✔︎ = test passed without issues.
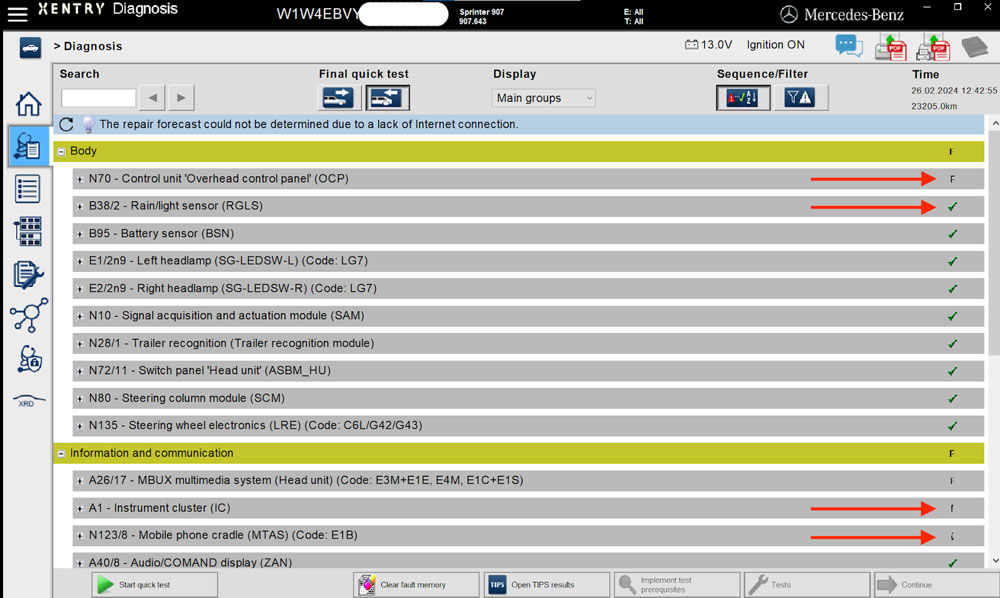
If you double-click a specific module, it will take you through to a screen with much more in-depth information about the fault/event/test, including listing part-codes and the relevant ECU.
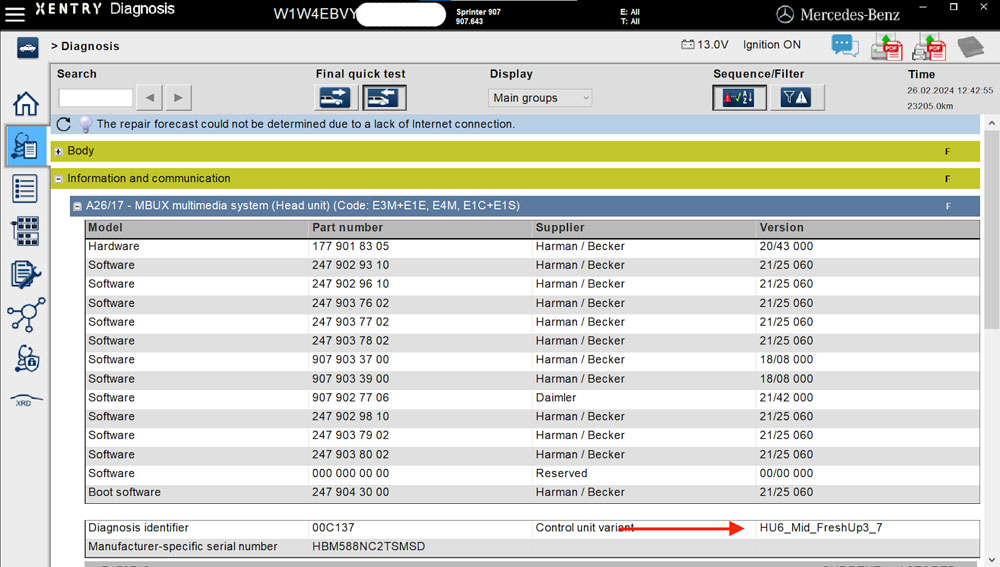
As mentioned above, the ECU information is required for setting up DTS Monaco correctly, so remember to come back to this. In the image below, I clicked through a stored and current fault in my 10” MBUX multimedia system and you’ll see the relevant ECU listed as “HU6_xx”. Note, the screenshot doesn’t actually show the code itself &nD-A-Sh; that’s information underneath that I didn’t grab.
Once you have gone through and looked at the various codes, go back to the main “Diagnosis” screen where you can clear the codes (DTCs) by pressing the “Clear fault memory” button (see image on previous page). You’ll get the following:
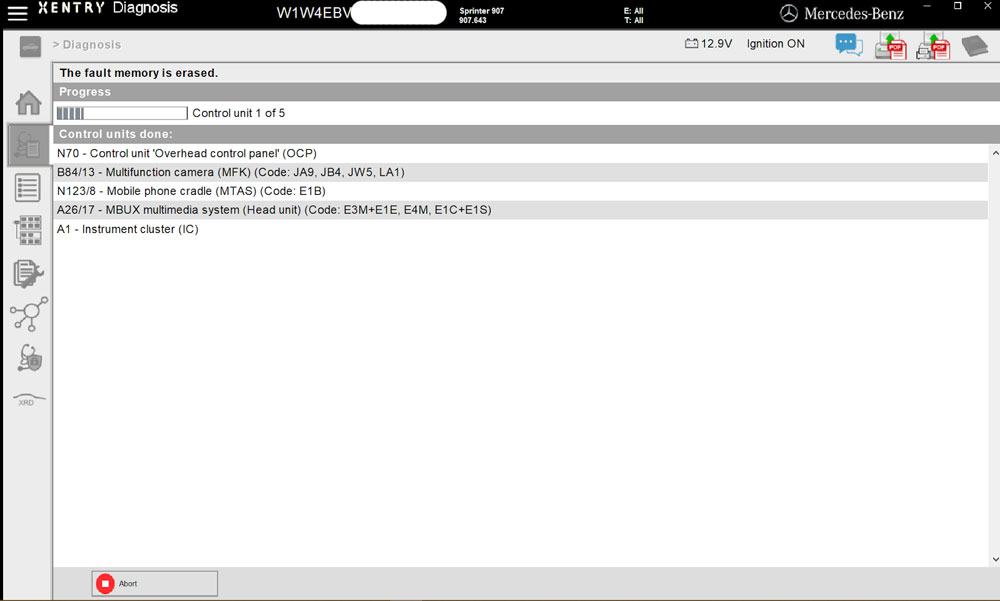
If you run a fresh quick test, you’ll see that the stored codes have been cleared:
Getting started with DTS Monaco
Once you’re comfortable with X-ENTRY and the larger STAR ecosystem, chances are you’ll want to start fiddling with the various codings and engineering of your van. Before you do, though, remember that this is where things can start to go south if you screw up. That said, it really isn’t as scary as many make it out to be.
DTS Monaco is a complicated and powerful piece of software that has many of the same functions as X-ENTRY, but also allows you to change the engineering and coding of your van, including enabling you to turn off that pesky (and, frankly, dangerous!) lane keep assist for good! While I managed to get going with X-ENTRY pretty quickly, DTS Monaco took longer, mostly because I didn't really have a good understanding of what I was even looking at. Let me try to walk you through some of the main aspects of this useful and fun piece of software.
ECUs and SMR-d files in DTS Monaco
DTS Monaco connects to your van via many different ECUs that control various functions. For example, your driver’s door has an ECU, your passenger door also has one, so does the MBUX, and on and on it goes. The important thing to understand here is that DTS Monaco needs files that tell the program everything about every single ECU &nD-A-Sh; what it is, what the codings are, etc. This varies depending on exactly what van you have and what options it’s fitted with. For example, for the MBUX in the VS30, if you have the 10” screen, then the ECU is (likely…) “HU6”. If you have the 7” screen, then it’s (likely…) “CONNECT907”.
For DTS Monaco to connect to these ECUs, it needs to know exactly what ECUs you have &nD-A-Sh; which is where X-ENTRY comes in again. In my van, I have 35 ECUs and I got the name of each ECU by clicking through the various units after running a quick test in X-ENTRY &nD-A-Sh; exactly what I showed a few pages up where I identified the “HU6” ECU as the one responsible for the MBUX system. I went through step by step and wrote down all these names and here’s what I got for my 2022 4×4 with the V6 Diesel:
ASBM_HU; BCMFA2; CPC_NG; CR61NFZ; DISP6; DMFL222_MOPF; DMFR222_MOPF; DSM222; ESP907; EZS167; FCW177; FSCM_GEN5; HERMES; HLI_FL247; HLI_FR247; HU6; HVAC_F177; HVAC_F907; IBS177; IC907; IMRR177_R1; IMRR177_R3; MMPC213; OHCM907; ORC177; PARKMAN213; SCCM177; SWSP177; TM205; TPMMFA2; UDCM; VCS177; VG907; VGS4NAG2; WMI213MOPF; WMI213MOPFR
The information DTS Monaco needs for each ECU is provided in “SMR-d” files (or, in earlier versions, CBF files, but you can likely ignore these). These can be found in the X-ENTRY package:
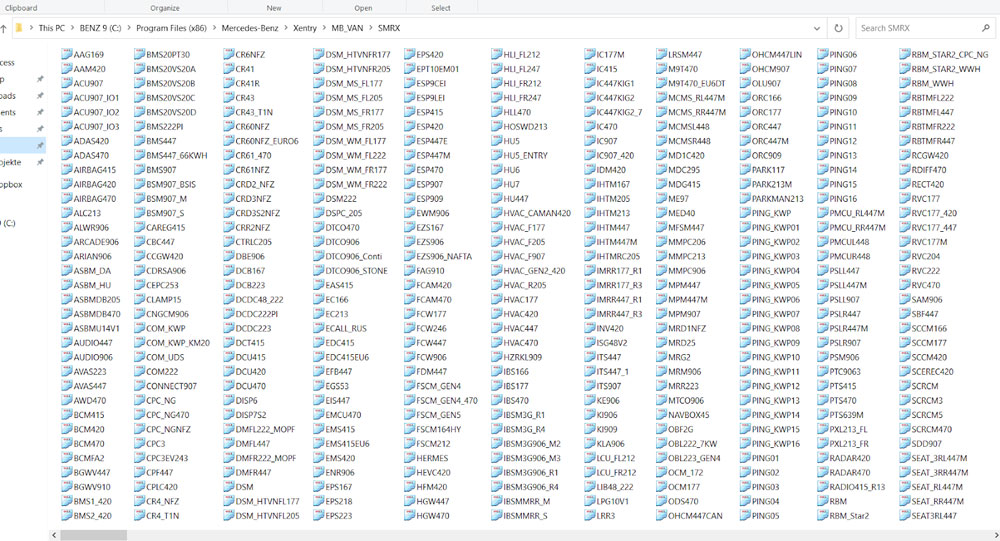
Select the ones you need (for my van, that would be the 35 ECUs above), based on the naming, which will be identical between the ECU and the SMR-d file (for example, notice the “HU6” file in the image above). Once they’re all selected, copy (don’t move) them to a new folder e.g., on your desktop.
Organizing ECU information in DTS Monaco using “Projects”
Once you have the SMR-d files copied to a separate folder, it’s time to import them into DTS Monaco. The way in which the software is organized is via a set of “Projects”, which is essentially a collection of relevant SMR-d files, and “Workspaces”, which is the actual workspace you will be working in when using the program. Each workspace needs a Project to work. Note, in theory you could import (almost) all SMR-d files into a single Project, but because your van won’t have most of the ECUs linked in those SMR-d files, you wouldn’t be able to connect to the referenced ECUs. Also, the Project file size would be huge and the program slow. Similarly, you also don’t need to import all the SMR-d files into a single Project, but could have individual Projects for working on the MBUX system, the engine, the doors, etc. I prefer having a single Project with all the relevant ECUs though, so that is what I will focus on here.
First, let’s boot up DTS Monaco v8:
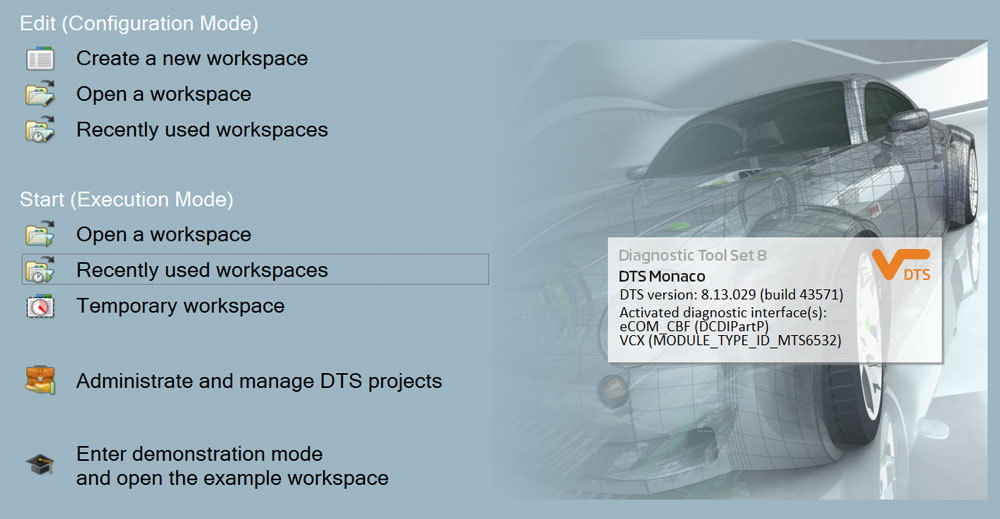
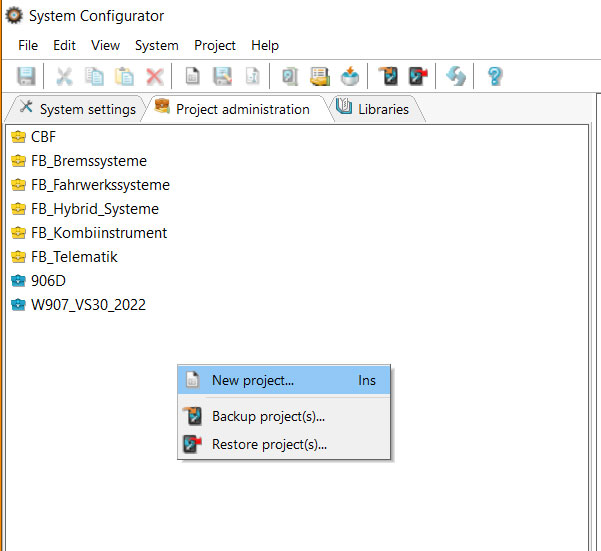
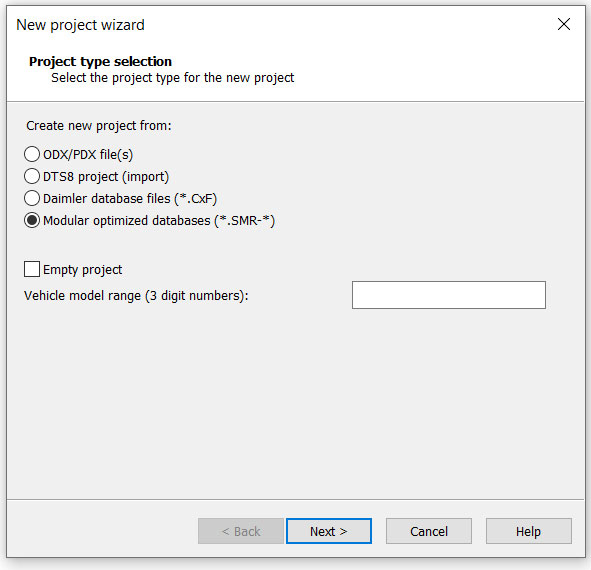
A few things to note here. In the box on the right you’ll see that I have my VCI connected to the computer “VCX (MODULE_xx)”. This is all controlled via “Interfaces”, but more on that later. The “Edit” mode is how we will get our “Workspace” set up, and the “Start” mode is the one we will use to actually run DTS Monaco. More on these later. For now, focus on “Administrate and manage DTS projects”, which is where we will get our SMR-d files imported, and a Project allowing us to connect to all the van’s ECU set up. Click the button and it will start up the System Configurator. In the “Project administration” tab, right click and select “New project”. In the next step, select the “Modular optimized databases” option, which will allow you to import the SMR-d files you previously copied to a new folder.
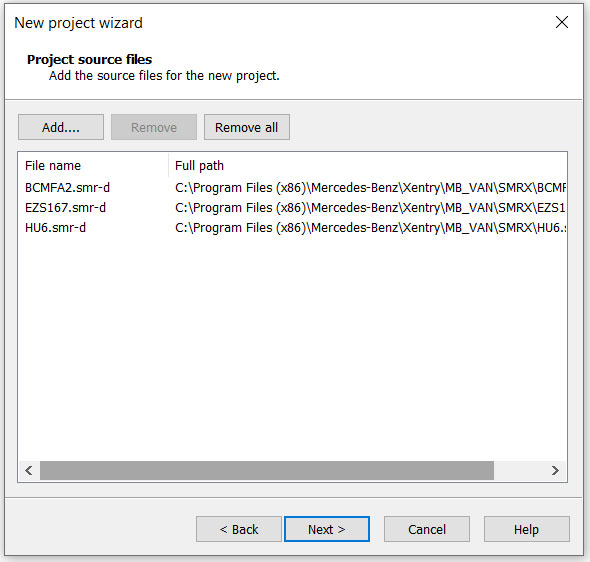
In the following example, I only selected three SMR-d files to keep it simple, however, for the Project I use with my van, I selected all 35 mentioned above. Remember, these are the SMR-d files you previously copied into a new folder from the “MB_VAN/SMRX” subfolder in the X-ENTRY folder (see above).
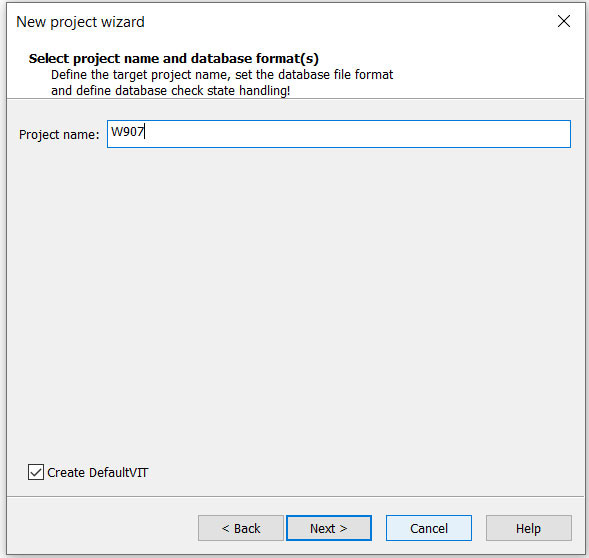
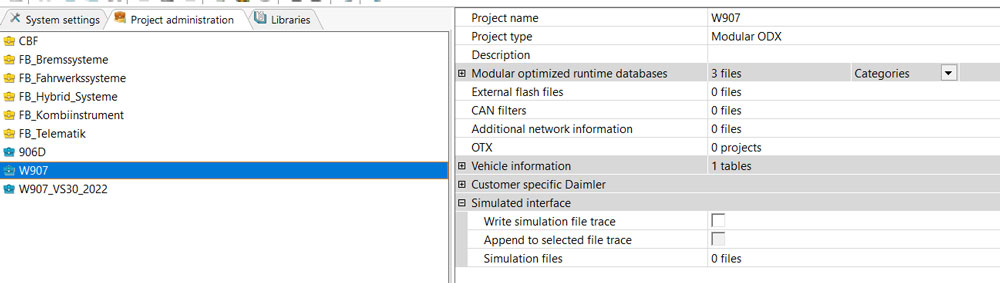
Next, name your Project and click through to create it. I named mine “W907” to reflect the van ID. That’s it.
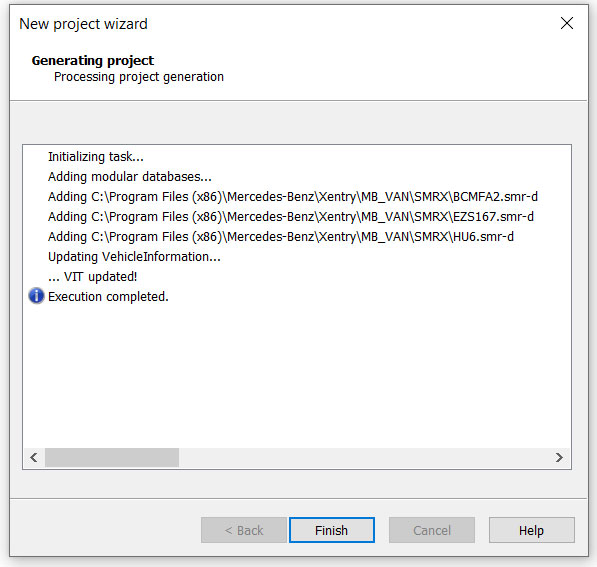
Once you’re back to the “Project administration” tab, you can see all the details about your new Project, including information about the imported SMR-d files, etc.
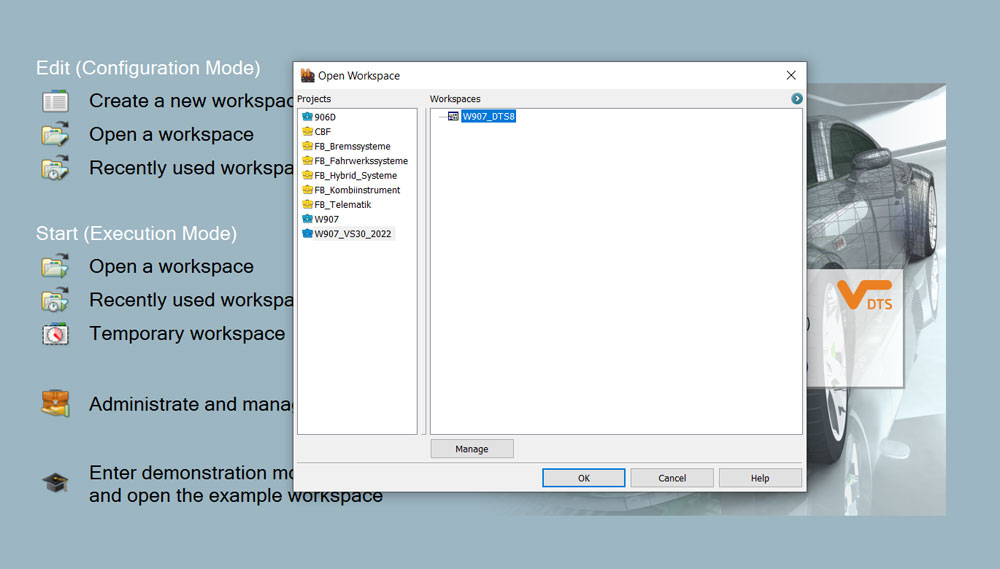
Creating “Workspaces” in DTS Monaco
Once you have set up a relevant Project, it’s time to create a Workspace so you can start working on your van in DTS Monaco. Remember, Projects are a collection of imported SMR-d files that tells DTS Monaco how to communicate with the various ECUs, whereas Workspaces simply create a set of interfaces that allows you to perform various coding, diagnostic, and engineering tasks on your van.
Go back to the main page of DTS Monaco and under the “Edit” mode, click the “Create a new workspace” button. DTS Monaco has several templates already built-in and we’re simply going to use one of those to get set up. Once set up, you can edit various aspects of your Workspace within DTS Monaco itself.
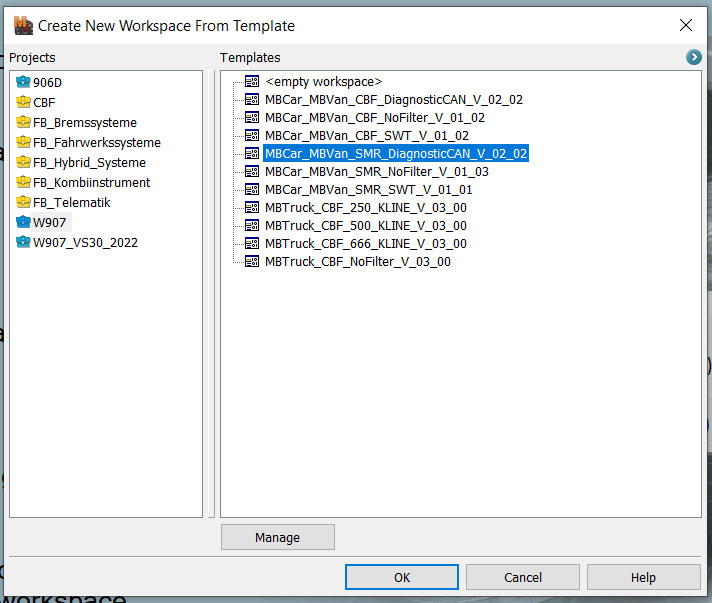
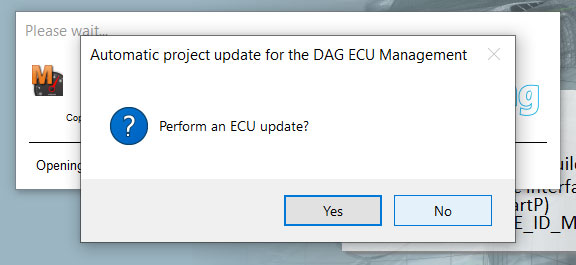
Select the Project you just created and the relevant template. Press “OK”. The main DTS Monaco program will open and as is always the case when you open up the program, it’ll ask you if you want to “Perform an ECU update”. Press “No” (don’t worry if you accidentally press “Yes” &nD-A-Sh; it won’t actually work).
Welcome to DTS Monaco! Once inside the program, press “Save” and give your Workspace a name:

You’re now ready to start working on your van. But first, you need to make sure interfaces are connected.
Checking Interfaces in DTS Monaco
To ensure that DTS Monaco can correctly communicate with your van, you need to make sure that your VCI has been set up correctly. In all likelihood, you don’t need to go through this, but in case you do. From the main screen of DTS Monaco, click the “Administrate and manage DTS projects” button again. This time, head over to “System settings”, where you will see the “Interfaces”. From here, click through to the various modules and make sure your VCI is listed. If you are using the VCX SE, then you need to have the following details, which will likely be similar / the same for other VCIs too:
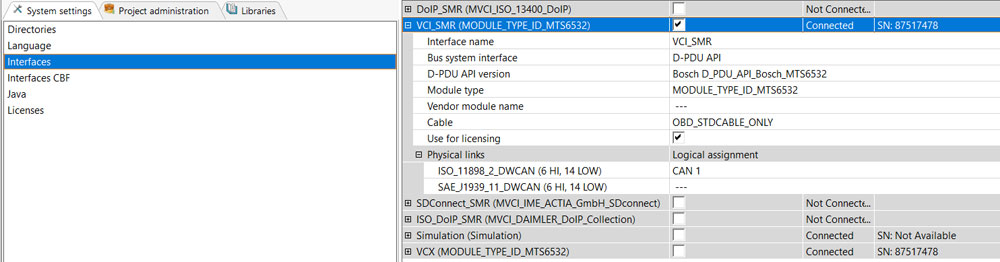
The “tick” box is the currently active interface that’s being used (“VCI_SMR” in my case). Note, there’s also a “Simulation” module, which will allow you to start up DTS Monaco, play around with things, etc., without the need for an actual VCI to be connected. If you right-click on the left-hand side, you’ll see a menu to update your VCI information, allowing you to see what is currently connected to your computer and what is not. In my case, that would be “VCI_SMR, “VCX”, and “Simulation”. The latter will always be shown as connected, since it doesn’t need actual hardware, and the reason why my computer is showing both VCI_SMR and VCX, despite me only having the VCX SE connected, is because those two have identical information. DTS Monaco can only have one VCI connected at a time, so none of this is a problem &nD-A-Sh; I simply created a duplicate for the purpose of writing this guide.
In the “Interfaces CBF” tab, also make sure that the “eCOM_CBF” interface has been ticked off:

Once all of this has been done, you are ready to get coding in DTS Monaco itself. Get excited!
Working in DTS Monaco
With everything set up, you are now ready to start working on your van. Remember, you are now going to be fiddling with the brain(s?) of the van itself, so you do run the risk of messing things up. I have heard claims that you may be able to brick your van when you do variant coding, however, I’m not really sure that’s true for most things. But as a precaution, keep all of this in mind and carefully document your own steps, including backing up coding files. You can upload entirely new ECU software and perform flashes in DTS Monaco, and I’m sure if those things go wrong, you can badly mess up your car, however, presumably a reflash back to stock can reverse the process.
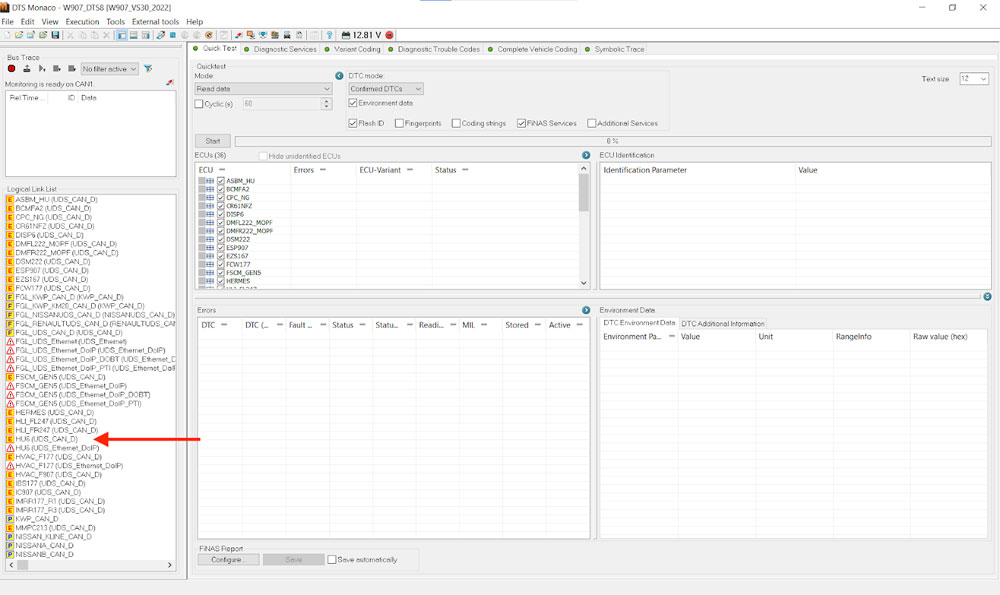
In the main DTS Monaco window, click the “Open a workspace” button and select the Workspace you just created. In the following, I’ll be using the Workspace I have been using for my van.
As per normal, it will ask you if you want to do an ECU update. Press NO. Wait for the program to load and you should now see your Workspace in DTS Monaco in all its glory. Remember those SMR-d files you imported as part of creating your Project? Those are the “Logical Links” on the left. Note, several versions are available because there are different interfaces that can connect &nD-A-Sh; only the connected ones will work and be active. In the example below, you’ll see me having highlighted the “HU6” ECU that controls the MBUX.
Defeating the firewall(s)
Before you can start doing any variant coding in DTS Monaco you need to defeat a firewall. Softing, who created DTS Monaco, presumably put these in place to ensure that only Real Professionals can work on your van. Right.
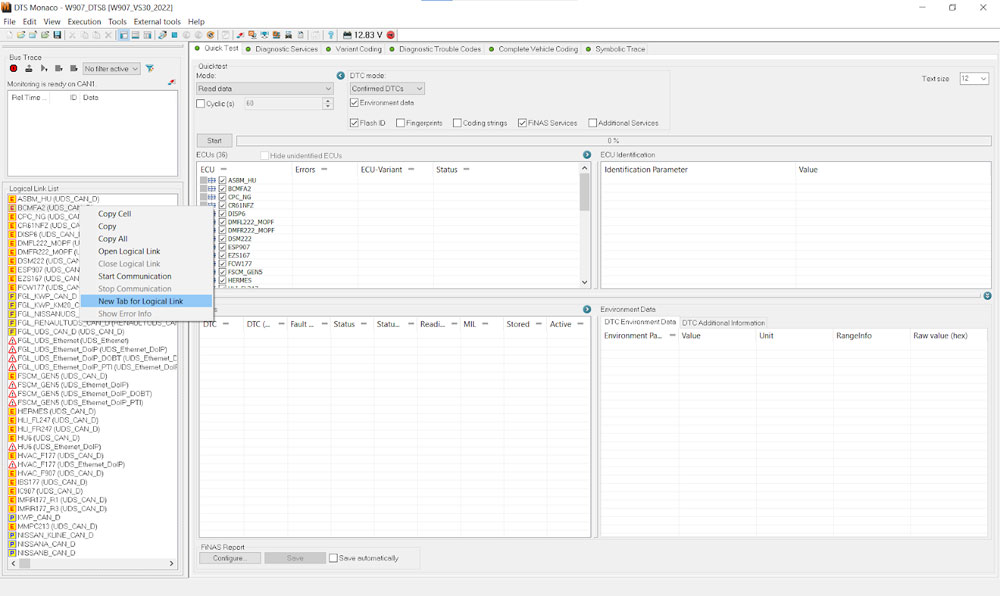
What firewalls are in place varies based on model year, etc. For my W907, I can open up the firewall via the EZS167 ECU, but before I show you how to do that, let’s first log into the BCMFA2 ECU, since that’s the way to open up the firewall in older vans. In the list of logical links, right-click on EZS167 and select “New Tab for Logical Link”. When you do this, you keep the link to that ECU open and you can have multiple ECUs open at the same time. In contrast, if you were to click through to this ECU via one of the tabs on top, you’d lose the connection once you click through to another one where you might want to do some coding. By having a single tab just for this ECU, you can ensure the connection is kept alive throughout your session.
Once that link is created, a new tab will open. In the new tab, go to “Generic Jobs” and select “Security Access Level 37”. Press the “Transmit” button and you should see a bunch of text in the window below. Provided that you see no text in red, in an older van, you should now have turned off the firewall.
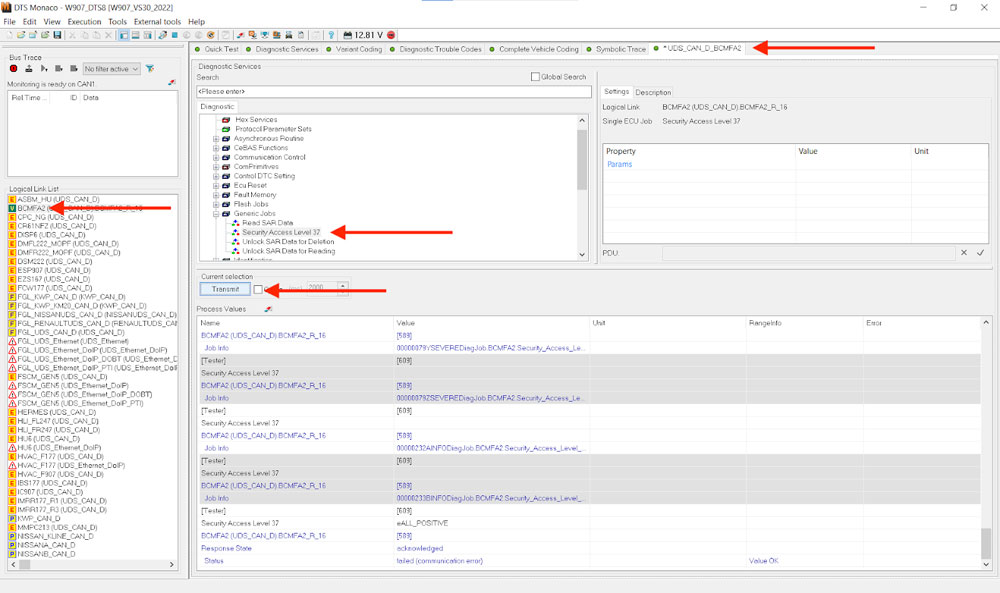
In a newer van, however, the process is a little different and, as mentioned above, done via the EZS167 ECU instead. Do the same process as described above, but this time it’s “Security Access Level 3B”.
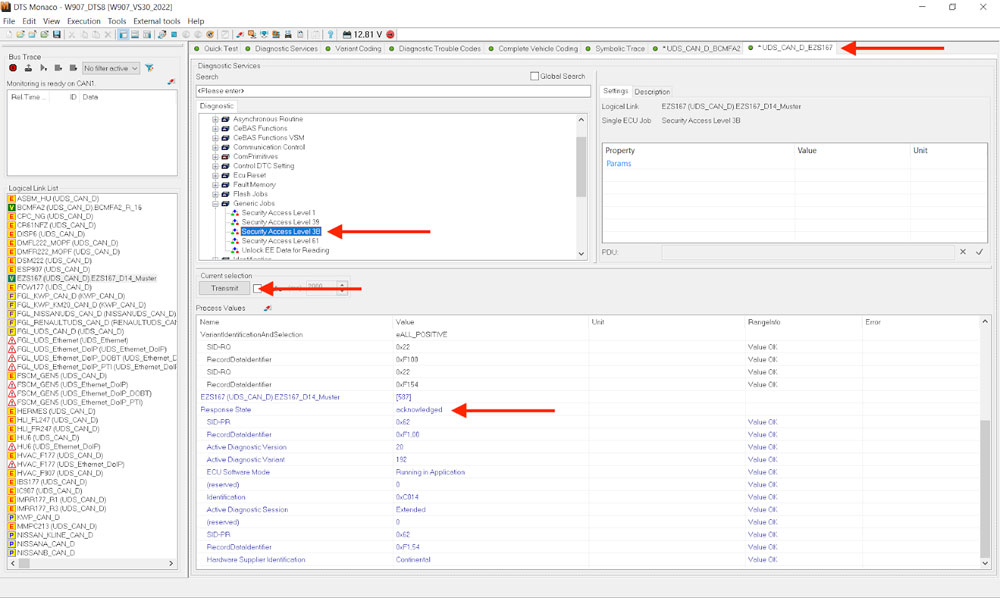
Click “Transmit” and provided that you see no red text and have “acknowledged” displayed under “Response State”, your firewall should now be deactivated.
Variant coding
Now, it is time to perform the actual variant coding. Open up the relevant ECU governing the features you want to change and open it in a new tab. In the example here, we open the MBUX’s “HU6” ECU. Once done, you first want to select the “Extended Start”and press Transmit in the new ECU tab you opened up:
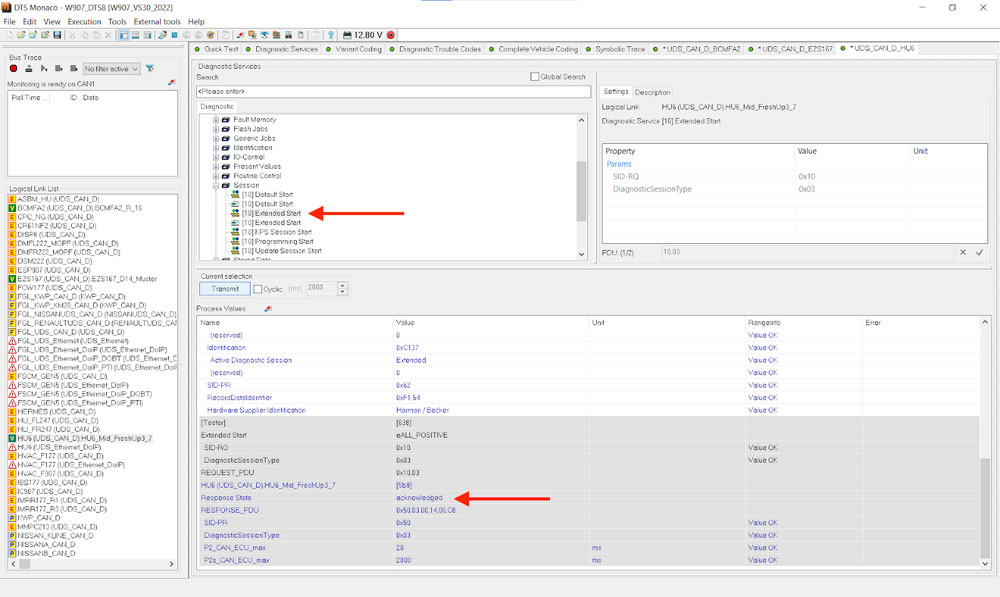
Provided that you correctly disabled your firewall and still have the relevant ECU (EZS167 and/or BCMFA2) open in a tab, you should see another “acknowledged” Response State. The ECU is now ready for coding.
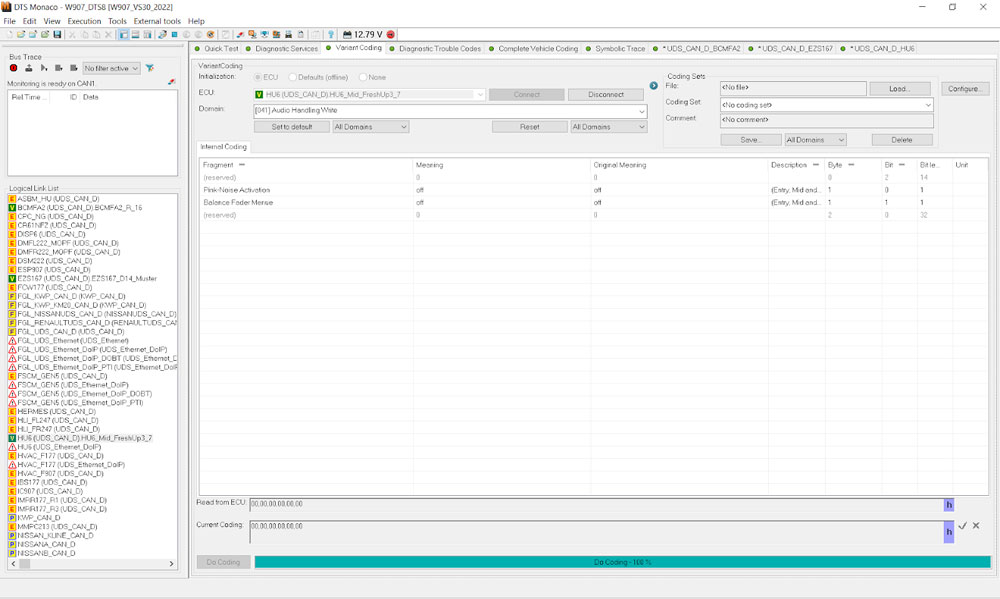
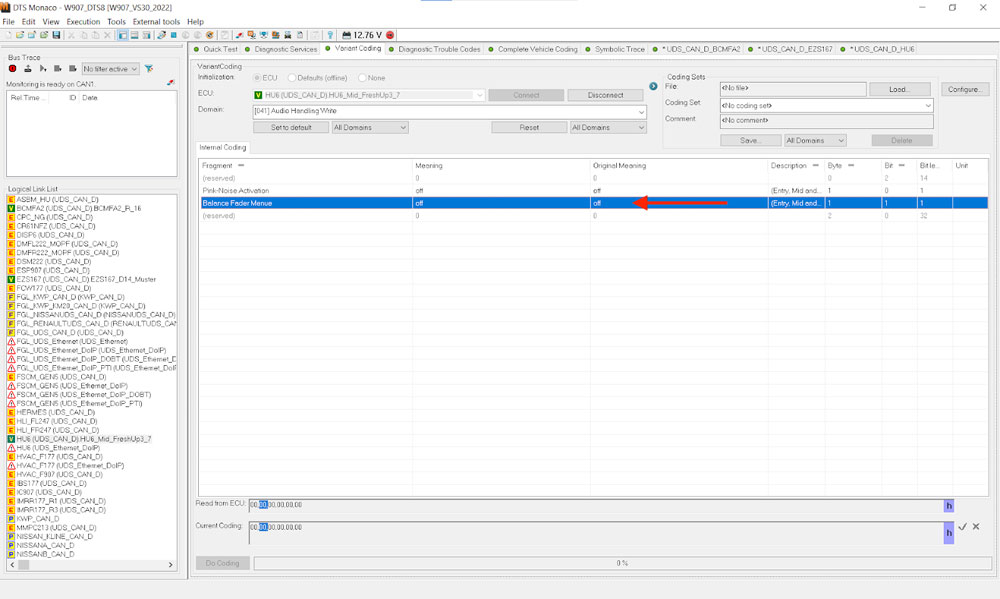
Go to the “Variant Coding” tab and select your ECU. It should connect &nD-A-Sh; if not, press “Connect”. Underneath the ECU you will see the “Domain” list. This is where the functions of the ECU can be accessed and is where you will actually find the values to change. In the example below I select “Audio Handle Write” to add a fader and balance to the MBUX (well, I already had it set to “ON”, so in this example I turn it back “OFF”):
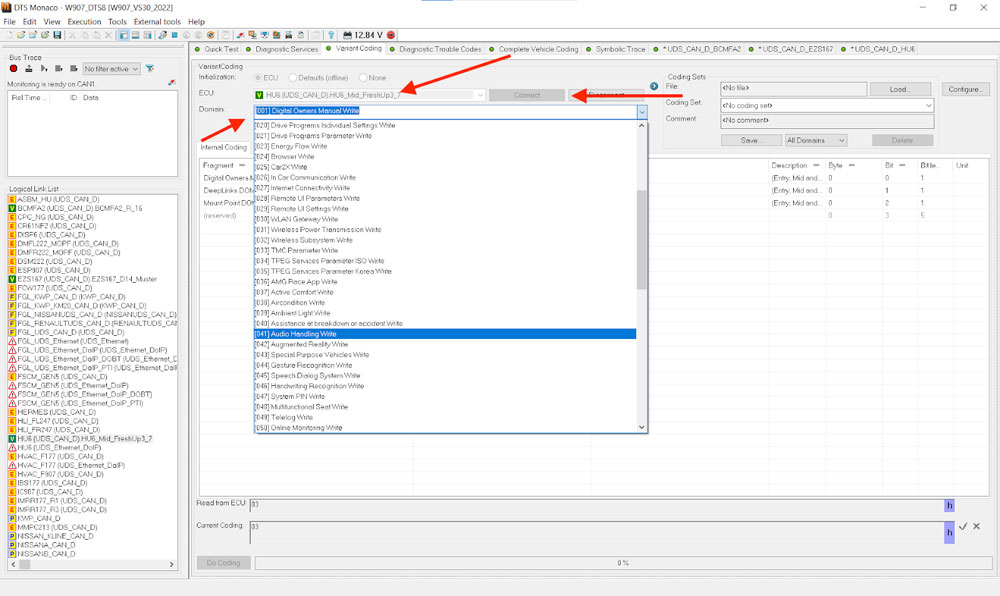
Find the relevant feature in the “Fragment” column &nD-A-Sh; here, “Balance Fader Menue”. Double-click the value under “Meaning” (this is what you’ll change it to) and a dropdown menu will open up &nD-A-Sh; select the new value you want. The original (or, rather, current) value is under “Original Meaning”:
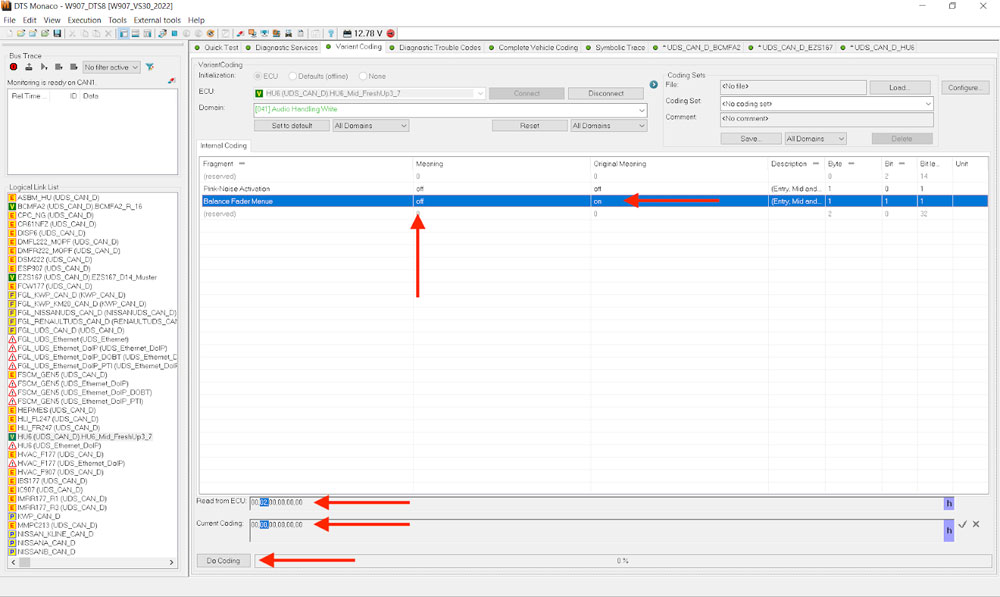
Also, notice the binary coding string under “Read from ECU” (what the ECU is currently coded for) and “Current Coding” (what you just selected). Once everything looks good, press the “Do Coding”. Provided that you have done all previous steps correctly, you should see no pop-ups and the bar next to “Do Coding” go to 100% and the new value presented under the “Meaning” column and Current Coding == Read from ECU.
IF you get a pop-up, Google the error code &nD-A-Sh; something went wrong in previous steps. I would suggest restarting the session again. Did you turn off the firewall? Turn on Extended Start? Those ECUs still connected?
Provided that everything went as expected, your ECU should now have the new values. HOWEVER, they haven’t actually transferred yet, so you need to go through a few additional hoops. Last step.
Making new variant coding values permanent
In older vans, a “Hard Reset” of your ECU should be sufficient to make your coding changes permanent, however, for newer vans, you need to go through a few more steps, so let’s do that first.
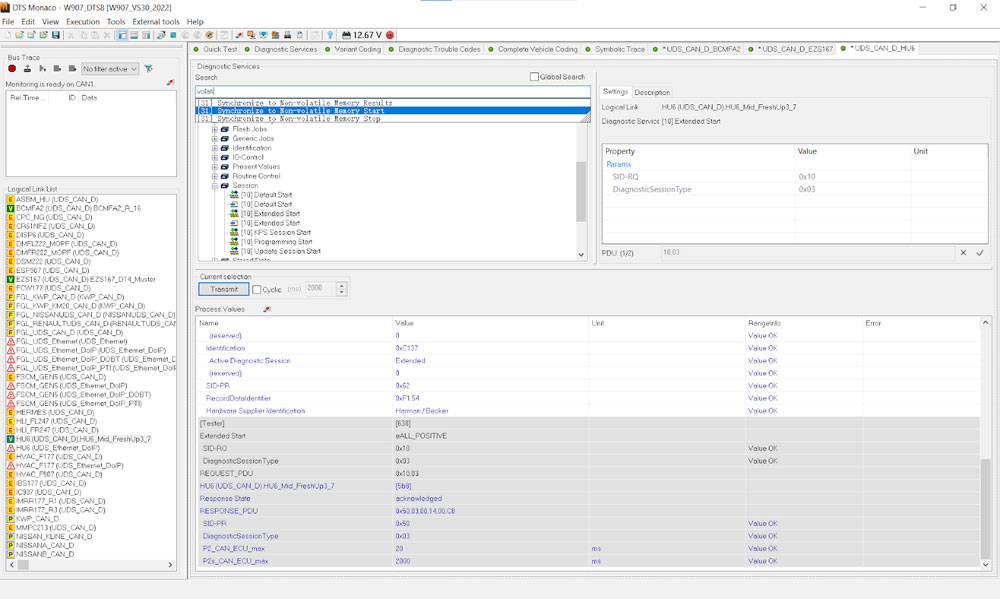
Click back to the open tab with the ECU you just changed variant coding for. In the “Diagnostic Services” search box, first find the “[31] Synchronize to Non-volatile Memory Start”. Click Transmit, and provided everything upstream was done correctly, you should get an “acknowledged” Response State and no red text.
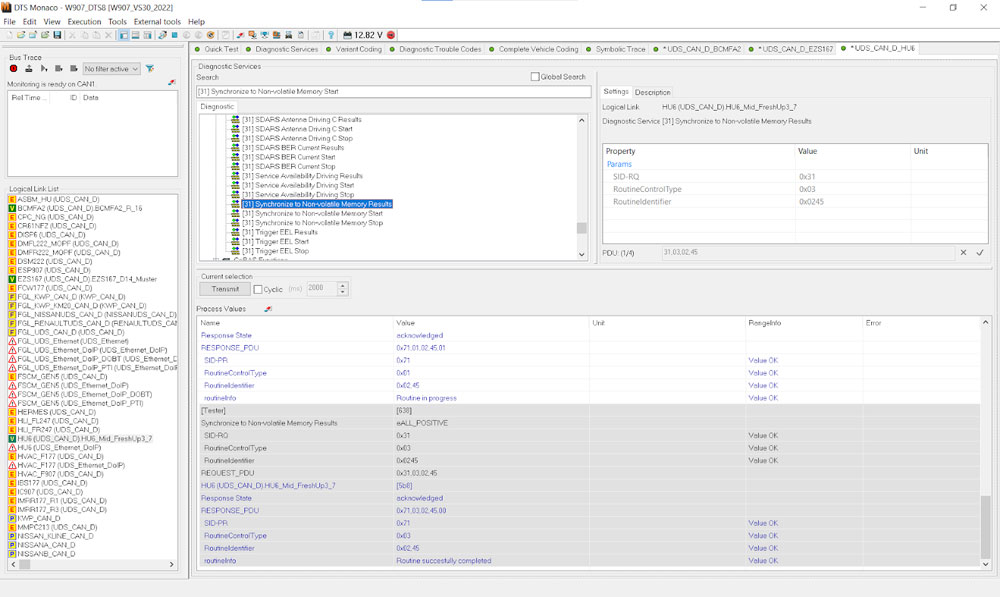
Next, click “[31] Synchronize to Non-volatile Memory Results”, followed by Transmit. Again, you should get an “acknowledged” Response State.
Now, it’s time to perform the Hard Reset of your ECU:
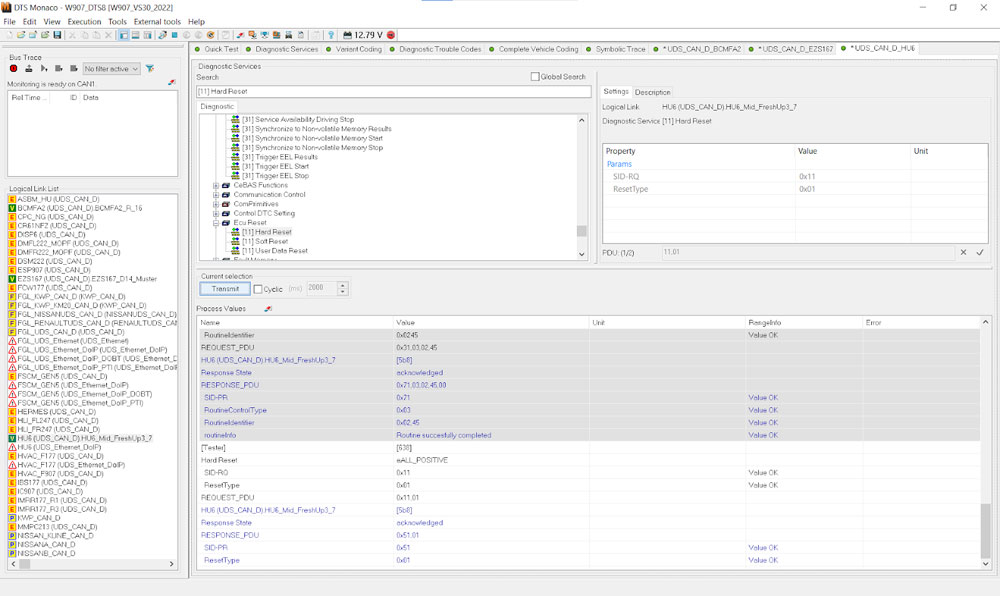
Do a Hail Mary, turn off the van, open the driver’s door, wait a few minutes, do another Hail Mary, and provided that your van did blow up in flames, the changes should now be permanent! You can check that by turning on the van (engine off), logging into the relevant ECU and then checking &nD-A-Sh; here, you’ll see my “Balance Fader Menue” is once again “off”.
DTS Monaco is much more powerful than just variant coding.
Hope it helps.